The Tesla Wall Connector reset button resolves charging issues by clearing error codes and restarting the system. It’s located on the side of the charger under a removable cover.
Understanding the Tesla Wall Connector
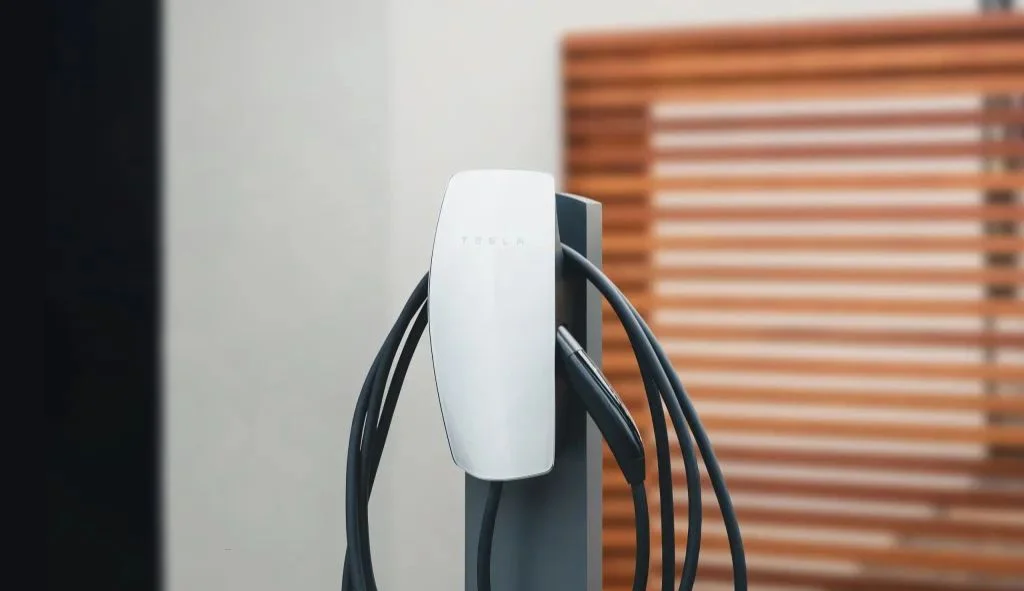
The Tesla Wall Connector serves as a home charging solution for Tesla vehicles, providing faster charging speeds than a standard outlet. This hardwired charging unit installs directly to your electrical panel and delivers higher amperage to reduce charging times significantly. The Wall Connector features a sleek design with an LED light strip on the front that displays different colors and patterns to indicate its status. These indicators help users identify when the charger is working normally or experiencing issues that might require a reset.
Over time, Tesla has released several generations of the Wall Connector, each with improvements in features and functionality. The latest generation (Gen 3) includes Wi-Fi connectivity for firmware updates and remote monitoring through the Tesla app. This connectivity allows Tesla to push updates to the charger automatically, improving performance and adding new features without requiring physical intervention. However, like any electronic device, the Wall Connector can sometimes encounter issues or glitches that affect its performance.
Types of Tesla Wall Connectors
Tesla has produced multiple generations of Wall Connectors, each identifiable by part numbers on their side labels. The current generation (Gen 3) Wall Connectors have part numbers displayed as TPN: 1529455-##-# or TPN: 1457768-##-#. These newer models connect to Wi-Fi for automatic updates and allow integration with the Tesla app for monitoring and scheduling. Earlier generations lacked these connectivity features but still provided reliable charging capabilities.
Each generation has slightly different troubleshooting procedures, though they all include some form of reset functionality. The physical appearance has evolved over the generations, with the newest models featuring a cleaner, more streamlined look. If you’re unsure which generation you have, check the part number on the side label or refer to your documentation. Taking a photo of this label for your records is recommended in case you need support in the future.
The Importance of the Reset Button
The reset button on your Tesla Wall Connector serves as a primary troubleshooting tool when charging issues occur. This small but essential button allows users to clear error codes and restore normal functionality without requiring professional assistance in many cases. The reset function can resolve various software glitches, communication errors, and fault conditions that might otherwise prevent charging.
Using the reset button properly can save time and money by avoiding unnecessary service calls. In many situations, a simple reset resolves temporary issues and restores normal operation. The button gives owners a way to attempt basic troubleshooting before contacting Tesla support or an electrician. Think of it as similar to restarting your computer when it experiences software issues – often, this simple step clears temporary problems and allows the system to function normally again.
Locating the Reset Button on Your Tesla Wall Connector
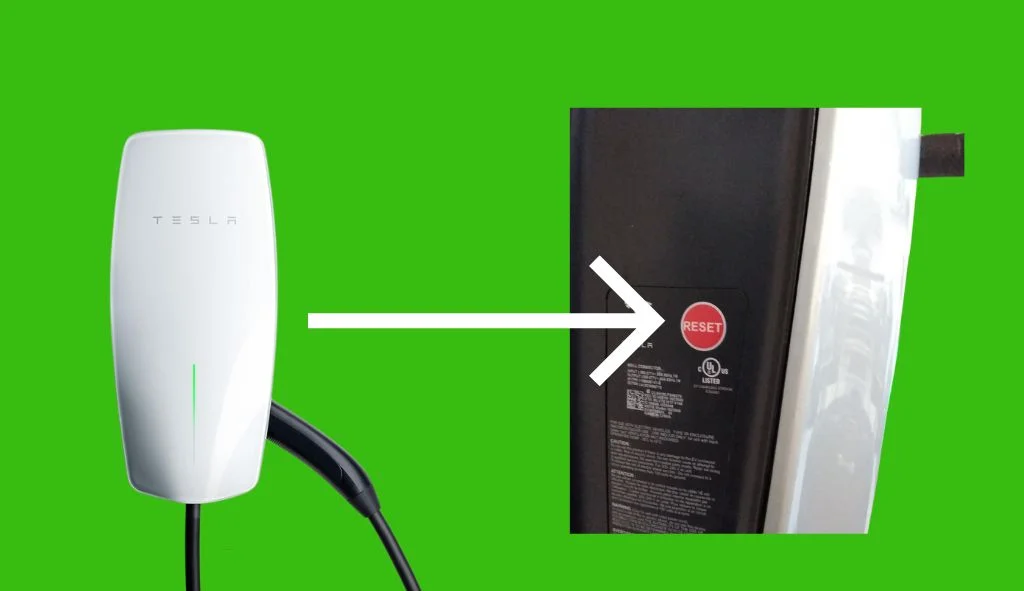
Finding the reset button is the first step in troubleshooting your Tesla Wall Connector. The button is not immediately visible from the exterior of the unit as it’s housed beneath a protective cover. To access it, you’ll need to remove the cover, which is typically secured with a single screw. Once removed, you’ll find the reset button on the side of the charger8.
The exact location may vary slightly depending on your Wall Connector generation, but it’s generally positioned on the right side of the internal components. The button is small and might be labeled as “Reset” or simply marked with a symbol. Keep the cover screw in a safe place to avoid losing it, as you’ll need to replace the cover after performing the reset to protect the internal components from dust and moisture.
Generation 3 Wall Connector
The Generation 3 Wall Connector features a reset button located on the side of the internal housing. To access it, you must first remove the front cover, which is held in place by a single screw at the bottom of the unit. After removing this screw, the cover can be lifted off to reveal the internal components. The reset button is small and located on the side of the charger’s circuit board8.
This generation of Wall Connector has enhanced connectivity features, including Wi-Fi capabilities that allow for remote monitoring and firmware updates. The reset function works in conjunction with these features to ensure proper operation. After performing a reset, you may need to recommission the unit and reconnect it to Wi-Fi to ensure all features function correctly.
Earlier Wall Connector Models
On earlier Tesla Wall Connector models, the reset button location varies slightly but follows a similar access method. You’ll still need to remove a cover plate, typically secured with a single screw, to access the internal components. The reset button might be more prominently labeled on these older models since they lack some of the advanced connectivity features of newer generations.
These earlier models may have different reset protocols and functionality compared to the Generation 3 units. Some older models might require longer button presses or alternative methods to achieve a full reset. If you have an earlier model and are experiencing issues, consulting the specific manual for your unit is advisable as procedures can vary between generations.
When to Use the Reset Button
Knowing when to use the reset button can save you time and prevent unnecessary service calls. Generally, you should consider resetting your Tesla Wall Connector when you notice error lights on the front LED strip, when the unit stops charging, or after power outages. The most common indicator that a reset might be needed is when the light on your Wall Connector displays a red pattern, either solid or blinking.
Different light patterns indicate specific issues. For example, a solid red light typically indicates an internal fault, while various blinking patterns correspond to different problems like ground faults, high temperatures, or communication issues. Before performing a reset, note the specific light pattern as this information can help identify the underlying issue and determine if a reset is the appropriate solution.
Common Error Codes and Light Patterns
The Tesla Wall Connector communicates issues through different light patterns on its LED strip. Understanding these patterns helps determine when a reset might resolve the problem:
- Solid Red Light: Indicates an internal fault with the Wall Connector. This often requires a reset and, if persistent, may need Tesla support.
- One Red Blink: Signals a ground fault circuit interruption due to an unsafe current path. Inspect for damage or water before resetting.
- Two Red Blinks: Shows a ground assurance fault with high ground resistance detected. This usually requires proper grounding verification by an electrician.
- Three Red Blinks: Indicates high temperature detection, which limits or disables charging. Check for warmth on the unit and ensure proper installation.
- Four Red Blinks: Signals lost internet connection, disabling online features. Verify Wi-Fi settings and signal strength.
- Five Red Blinks: Indicates power-sharing communication issues between multiple Wall Connectors, reducing charging speed.
- Six Red Blinks: Shows overvoltage or poor grid quality detection. Verify power supply voltage.
- Seven Red Blinks: Signals vehicle overcurrent detection. Try reducing the vehicle’s charge current setting.
All red blink codes pause for one second before repeating, which helps in identifying the specific error pattern.
Troubleshooting Issues Before Resetting
Before reaching for the reset button, perform some basic troubleshooting steps to identify and potentially resolve the issue without a reset:
- Check Power Supply: Verify that the circuit breaker for the Wall Connector is in the “on” position and hasn’t tripped. No lights on the unit typically indicate a power supply issue.
- Inspect for Physical Damage: Examine the charging cable, handle, connector, and vehicle charging port for any signs of damage or water ingress.
- Verify Wi-Fi Connection: For generation 3 units, check that the Wall Connector is connected to Wi-Fi for firmware updates. Outdated firmware can cause issues.
- Check Vehicle Settings: Ensure your Tesla or other EV doesn’t have conflicting charge schedules or settings that might prevent charging.
- Monitor Temperature: During hot weather, the Wall Connector might limit charging due to high temperatures. Allow it to cool down before attempting to charge again.
If these basic troubleshooting steps don’t resolve the issue, then using the reset button becomes the next appropriate step in the troubleshooting process.
How to Reset Your Tesla Wall Connector
Tesla Wall Connectors provide multiple reset options depending on the severity of the issue you’re experiencing. The reset process involves pressing the reset button for different durations to achieve either a standard reset or a full reboot. Additionally, power cycling through the circuit breaker offers another method to reset the unit when needed.
Before attempting any reset procedure, it’s advisable to unplug your vehicle from the Wall Connector. This ensures a clean reset process and prevents any potential issues that might arise from having the vehicle connected during the reset. After completing the reset, allow the Wall Connector a moment to initialize before reconnecting your vehicle.
Standard Reset Procedure (2-3 Second Press)
The standard reset procedure clears fault messages without fully rebooting the Wall Connector:
- Locate and remove the cover to access the reset button on the side of the Wall Connector.
- Press and hold the reset button for 2-3 seconds.
- Watch for the light on the front to change from red to green.
- Release the button once the light changes color8.
This standard reset clears the fault message but doesn’t reboot the Wall Connector completely. It’s the first reset method to try when troubleshooting issues. If successful, the light should remain green, indicating the Wall Connector is ready for use. This method works well for minor glitches and temporary error states.
Full Reboot Reset Procedure (5 Second Press)
For more persistent issues, a full reboot of the Wall Connector may be necessary:
- Access the reset button as described earlier.
- Press and hold the reset button for 5 seconds.
- When the top light changes from red to green, release the button.
- The top light should continue to illuminate green.
- If the light returns to flashing red, the fault condition has not been corrected8.
This more thorough reset forces the Wall Connector to reboot completely, similar to restarting a computer. It’s particularly useful when the standard reset doesn’t resolve the issue or when more significant software glitches occur. After performing this reset, you may need to reconnect to Wi-Fi and verify settings if you have a Generation 3 Wall Connector.
Power Cycling Method
If the reset button methods don’t resolve the issue, power cycling the Wall Connector through the circuit breaker provides another option:
- Locate the circuit breaker that powers the Wall Connector in your electrical panel.
- Turn the circuit breaker to the “off” position.
- Wait for at least 5-10 seconds to ensure all residual power drains from the unit.
- Switch the circuit breaker back to the “on” position.
- Wait for the Wall Connector to power up and initialize.
This method completely removes power from the Wall Connector, allowing for a clean restart of all systems. It’s particularly effective for resolving more stubborn issues or when the reset button isn’t accessible or functioning properly. After power cycling, the Wall Connector should go through its startup sequence and display a green light if functioning correctly.
Connecting Your Wall Connector to Wi-Fi
For Generation 3 Wall Connectors, Wi-Fi connectivity enables automatic firmware updates and remote monitoring through the Tesla app. Establishing this connection is crucial for maintaining optimal performance and accessing all features. The Wi-Fi setup process, called commissioning, involves connecting to the Wall Connector’s own Wi-Fi network temporarily to configure it for your home network.
A properly connected Wall Connector receives the latest firmware updates automatically, ensuring you benefit from performance improvements and new features. These updates can sometimes resolve issues without requiring manual resets, making Wi-Fi connectivity an important part of the troubleshooting process. Additionally, the connection allows you to monitor charging sessions and control scheduling through the Tesla app.
Commissioning Process
To commission your Generation 3 Wall Connector and connect it to Wi-Fi:
- Ensure your Wall Connector is powered by turning on the circuit breaker. The unit will broadcast its Wi-Fi network for only 5 minutes after powering up.
- If you miss this window, either hold the button on the charging handle for 5 seconds or toggle the circuit breaker off and on again to restart the broadcast.
- On your smartphone or tablet, connect to the Wall Connector’s Wi-Fi network. The network name (SSID) appears as “TeslaWallConnector_” followed by a six-digit code.
- Use the password (WPA2) found on the Quickstart guide cover page. You can also scan the QR code on the guide to connect directly.
- Once connected, open a web browser and navigate to http://192.168.92.1 to access the configuration interface.
- Follow the on-screen instructions to select your home Wi-Fi network and enter your password.
- The Wall Connector will then connect to your home network, allowing for remote access and updates.
After successful commissioning, residential customers can register their Wall Connector in the Tesla app to access additional features like charging stats and history. The commissioning process also allows setting the circuit breaker rating and output amperage for safe operation.
Manual Firmware Updates
If your Wall Connector can’t connect to Wi-Fi for automatic updates, you can perform manual firmware updates:
- Download the latest firmware file (currently Firmware 24.44.3) to your mobile device or laptop.
- Connect to your Wall Connector’s Wi-Fi access point using the SSID and password from the Quickstart guide.
- Open a web browser and navigate to http://192.168.92.1/update or http://192.168.92.1/service.
- Select “Choose File” and upload the downloaded firmware file.
- Click “Upload” and wait up to one minute for the process to complete.
- A success message will appear if the update succeeds, and your Wall Connector may reboot.
- If the update fails, power cycle the Wall Connector by turning the circuit breaker off and back on, then try again.
Keeping your firmware updated ensures optimal performance and access to the latest features. If you repeatedly encounter issues with firmware updates or Wi-Fi connectivity, checking for physical obstructions or interference that might affect signal strength can help identify the root cause.
Advanced Troubleshooting for Tesla Wall Connectors
When basic reset procedures don’t resolve issues with your Wall Connector, more advanced troubleshooting becomes necessary. Different symptoms require specific approaches, and understanding the meaning behind various light patterns helps narrow down potential causes. Advanced troubleshooting often involves examining electrical components, checking voltage readings, or inspecting physical connections.
While some advanced troubleshooting steps can be performed by owners, others require professional expertise. Electrical measurements and internal inspections should only be conducted by qualified electricians to ensure safety. Documentation of error patterns, part numbers, and specific behaviors helps both when seeking professional assistance and when contacting Tesla support.
Solid Red Light Issues
A solid red light on your Tesla Wall Connector indicates an internal fault that has disabled charging. This is one of the more serious error indications and often requires specific steps to resolve:
- First, try the standard reset procedure by turning the circuit breaker off, waiting 5 seconds, and turning it back on again.
- If the solid red light persists after this reset attempt, document the part number and serial number from the side label of your Wall Connector.
- Check if the unit feels abnormally warm or shows any signs of physical damage.
- If the issue continues after a reset, contact Tesla support with your documentation, as this may indicate a hardware failure requiring replacement or repair.
The solid red light specifically points to internal component issues rather than external factors like power supply or connection problems. While waiting for professional assistance, avoid using the Wall Connector to prevent potential damage to your vehicle or electrical system.
Blinking Red Light Patterns
Different blinking patterns indicate specific issues that may require targeted troubleshooting:
For one red blink (ground fault circuit interruption):
- Inspect all components for damage or water exposure
- Check that the charging handle hasn’t been dropped or damaged
- Have an electrician verify ground connections
For two red blinks (ground assurance fault):
- Verify proper grounding of the Wall Connector
- Have an electrician check all physical connections, including wirebox terminals and panels
- Ensure ground connection is properly bonded in the upstream power supply
For three red blinks (high temperature):
- Connect to Wi-Fi for latest firmware
- Check for excessive warmth on the faceplate and cable handle
- Have an electrician verify conductor sizing and terminal torque specifications
For four red blinks (internet connection lost):
- Check for objects interfering with Wi-Fi signal
- Verify your home router is operational
- Update Wi-Fi settings if your password has changed
For five red blinks (power-sharing communication issue):
- Check for Wi-Fi interference
- Re-link Wall Connectors for power-sharing through the commissioning process
For six red blinks (overvoltage/poor grid quality):
- Verify power supply is nominal 200-240 volts
- Have an electrician check voltage readings at the terminal block
For seven red blinks (vehicle overcurrent):
- Reduce the vehicle’s charge current setting
- Record vehicle VIN and fault time if the issue persists
No Light Issues
When your Wall Connector shows no lights at all, this typically indicates a power supply issue that has disabled charging. Here’s how to troubleshoot:
- Check that the dedicated circuit breaker for the Wall Connector is turned on and hasn’t tripped.
- If the breaker appears to be on but there’s still no light, try turning it off and back on to reset it completely.
- If power cycling the breaker doesn’t resolve the issue, have an electrician remove the Wall Connector from the wirebox and check for voltage at the terminal block using a multimeter.
- The electrician should record three voltage readings: Line 1 to Line 2, Line 1 to Ground, and Line 2 to Ground to identify any power supply issues.
No lights can indicate simple problems like a tripped breaker or more complex issues like wiring faults or internal power supply failures. Starting with the simplest explanation (checking the breaker) before progressing to more complex troubleshooting helps efficiently identify the cause.
When to Contact Tesla Support
While many issues can be resolved through resets and troubleshooting, some situations require professional assistance from Tesla. Contact Tesla support when reset procedures fail to resolve persistent error codes, when there’s physical damage to the Wall Connector, or when you experience repeated disconnections despite following all troubleshooting steps.
Tesla support can provide specialized guidance based on your specific Wall Connector model and the nature of the issue. They may be able to perform remote diagnostics if your unit is connected to Wi-Fi or walk you through additional troubleshooting steps not covered in standard documentation. In some cases, they might determine that replacement parts or a new unit is necessary.
Documenting Important Information
Before contacting Tesla support, gather the following information to facilitate faster assistance:
- The part number and serial number from the side label of your Wall Connector (take a photo if possible).
- A description or video of the LED light pattern during the fault state.
- The timeframe when the issue began or was first observed.
- If applicable, the VIN of the vehicle that was connected when the issue occurred.
- Any error messages displayed on your vehicle’s screen during charging attempts.
- A list of troubleshooting steps you’ve already attempted and their results.
Having this information ready streamlines the support process and helps Tesla technicians understand your specific situation more quickly. Detailed documentation also helps track issues if they recur after initial resolution.
Tesla Support Contact Methods
If you need to contact Tesla for Wall Connector support, several options are available:
- Visit tesla.com/support/contact to submit an online support request. You’ll need to sign in to your Tesla account.
- Call the Tesla customer support line:
- United States: (888) 765-2489 or (650) 963-5655
- United Kingdom: 0800 756 9960
- Additional regional numbers may be available on the Tesla website.
- Use the “Diagnose” button on the Tesla Wall Connector support page, which guides you through preliminary troubleshooting before connecting you with a technical support agent if needed.
Tesla support representatives are trained to handle Wall Connector issues and can provide guidance specific to your situation. In some cases, they may arrange for replacement parts or schedule a service technician if necessary.
FAQs About Tesla Wall Connector Reset
How do I know if my Tesla Wall Connector needs a reset?
You’ll likely need to reset your Wall Connector if it displays a red light (solid or blinking), stops charging your vehicle, or loses connection to Wi-Fi. Different light patterns indicate specific issues, so note the pattern before resetting.
Can I damage my Tesla Wall Connector by resetting it too often?
No, resetting your Wall Connector won’t cause damage. The reset function is designed for troubleshooting and can be used as needed without harming the unit. However, if you find yourself needing to reset frequently, there may be an underlying issue requiring professional attention.
Will resetting my Wall Connector delete my Wi-Fi settings?
A standard 2-3 second reset shouldn’t affect your Wi-Fi settings. However, a full 5-second reset or power cycling might require reconnecting to Wi-Fi in some cases. Keep your Quickstart guide with the Wi-Fi password handy in case you need to reconnect.
What should I do if my Wall Connector still shows errors after resetting?
If errors persist after multiple reset attempts, contact Tesla support with details about the specific error light pattern, your Wall Connector model, and what reset methods you’ve tried. Some issues may require professional diagnosis or component replacement.
How do I factory reset my Generation 3 Wall Connector?
To perform a factory reset on a Generation 3 Wall Connector, power cycle the unit by turning off the circuit breaker, waiting 10 seconds, and turning it back on. For a more complete reset, hold the button on the charging handle for 5 seconds or turn the circuit breaker off and on again to restart the commissioning process.
Can I reset my Wall Connector remotely through the Tesla app?
Currently, there’s no option to reset your Wall Connector remotely through the Tesla app. All reset procedures require physical access to either the reset button on the unit or the circuit breaker controlling power to the Wall Connector.
Do I need to recommission my Wall Connector after a reset?
If you performed a standard reset (2-3 seconds), recommissioning isn’t typically necessary. However, after a full reset (5 seconds) or power cycling, you might need to reconnect to Wi-Fi and verify settings, especially if the unit was not properly completing the initial configuration.
How often should the Tesla Wall Connector receive firmware updates?
Tesla releases firmware updates periodically to improve performance and add features. There’s no set schedule, but connecting your Wall Connector to Wi-Fi ensures it receives these updates automatically as they become available. As of this writing, the current firmware version is 24.44.3.